CIS 565 - Setup instructions for CETS Virtual Lab
Using CETS Virtual Lab for CIS 565
The Virtual Lab connects you remotely to computers available to CETS. Note that not all computers have useful GPUs. We want to use computers that have NVIDIA Quadro P1000 GPU.
Note: Quadro P1000 does not support DirectX RayTracing. It supports the fallback layer, but requires Developer Mode to be enabled which requires Admin access. We are working with CETS to understand if this can be enabled.
Connecting to the Virtual Lab
- You need to first connect to the Penn VPN: https://www.isc.upenn.edu/how-to/university-vpn-getting-started-guide
- Once installed and connected, you can connect to the Virtual Lab: https://cets.seas.upenn.edu/answers/virtuallab.html
- Since the lab is a mix of computers (CETS added some lab computers for greater capacity during the closure), you may get one of a number of different model NVIDIA GPUs, or none at all. When you log in you can open a command prompt window and run
nvidia-smi.- If the command does not exist, check if the file exists at
C:\Program Files\NVIDIA Corporation\NVSMI\nvidia-smi.exe. Run this if it exists. If it does not exist, the NVIDIA GPU driver is not installed. Logout of this machine and reconnect to Virtual Lab again. - If the command runs, it will produce an output similar to this. Check the GPU Name - If it is
Quadro P1000, continue using this machine. Otherwise, logout of this machine and reconnect to the Virtual Lab and try again.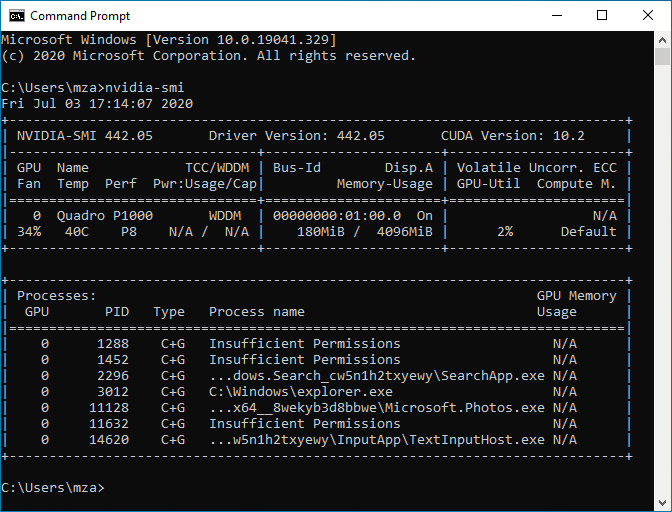
- If the command does not exist, check if the file exists at
- Great thing about CETS Virtual Lab computers is that they come with all the required software installed. You do not need to do anything else.
Developing Software in Virtual Lab PCs
Using the Virtual Lab PCs is similar to using Moore Lab - unless you use the correct directories and network drives, your data will be wiped with each use.
When you directly compile and build projects stored on network drives, you may run into Visual Studio compilation issues.
If you have been using Moore Lab for previous projects and have workarounds for this, feel free to continue using those practices.
Otherwise, you can either copy projects to-and-from the network drives to local storage, or you can use git to push and clone your work. If you are copying your projects, make sure to use consistent paths because of CMake, otherwise you will need to delete the CMake cache and regenerate it.